Introduction
As a principal test engineer at BLOOMY®, one of my roles is to anticipate our customers’ test requirements so that we can evolve our automated test solutions to meet their current and future needs. A common request I receive is the ability for the user to interactively select which tests to run from a menu of tests on the user interface, prior to test sequence execution.
The majority of our test solutions use NI TestStand as a test executive along with the BLOOMY EFT Module for TestStand. TestStand is often thought of as a fully automated test application, where the test operator presses a button to start testing, and TestStand sequentially executes ALL of the tests in the test sequence through completion, unless some preconfigured post-test step conditions are met, such as Terminate On Failure. Since the fully automated use case is quite common, it can be challenging to architect a TestStand solution that will selectively execute specific tests.
In this blog, I present a relatively simple TestStand architecture that will allow a test operator to selectively execute any combination of tests that will meet this common customer request. This solution is in no way intended to claim to be the best solution for this requirement. Instead, I hope it inspires you to take this solution and modify it for your own needs, or motivate you to come up with your own unique architecture. Please feel free to share your architectures in the comments section of this blog post.
One final note before we begin, this solution integrates equally with the BLOOMY EFT Module for TestStand, as well as native TestStand as purchased from NI. However, the illustrations and examples I present utilize BLOOMY’s EFT Module for TestStand.
Test Menu – A high level view
So let’s begin with a high level view of the operator interface control that will allow an operator to select which tests to run while the interface is running. Figure 1 below is a screen shot of the Test Menu as it appears embedded within the BLOOMY EFT Module’s Manufacturing Operator Interface . If you are not using the BLOOMY EFT Module, the Test Menu normally appears as a pop-up window while natively executing a test sequence in TestStand.
As you can see in Figure 1, the Test Menu control is located in the right windowpane of the BLOOMY EFT Operator Interface. You will notice that the default selection is to execute All Tests. Thus, the operator simply needs to press the Tests Selected button to run all tests. To select a single test, the operator would click on the desired test name in the Test Menu and then press the Tests Selected button. To select any combination of tests, the operator presses the <Ctrl>
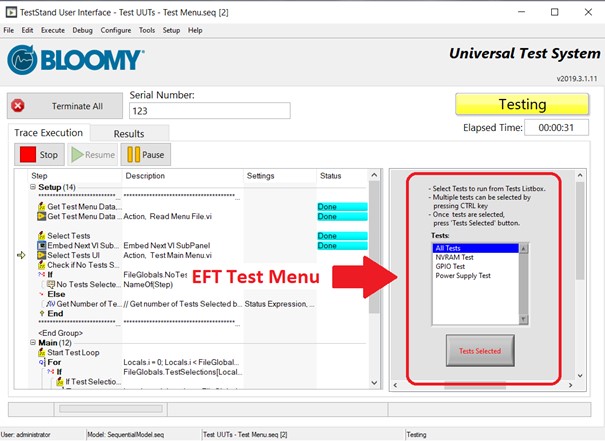
Figure 1 - BLOOMY’s EFT Module for TestStand has a Test Menu control allowing the user to select any combination of tests to run.
The Test Menu utilizes three components for its architecture:
- A relatively simple and dynamic TestStand sequence architecture
- A pair of simple LabVIEW VIs
- Read Menu File.vi
- Test Main Menu.vi
- A flat text file, aka Test Menu Data file
Let’s take a deeper dive into each of these so you can get a better understanding of how this works.
TestStand Sequence – The primary component
Being a TestStand-based application, a TestStand sequence is the primary component of the Test Menu control, “gluing” all of the other components together to provide a flexible test menu solution. The TestStand sequence is a relatively simple architecture that is designed to minimize maintenance needs by utilizing the dynamic flow control steps in TestStand to support any number or variety of tests.
Figure 2 provides an overview of the Test Menu sequence. I’ve highlighted specific areas of the test sequence in red. I will discuss the specifics about each of these areas of the TestStand sequence file in the sections that follow.
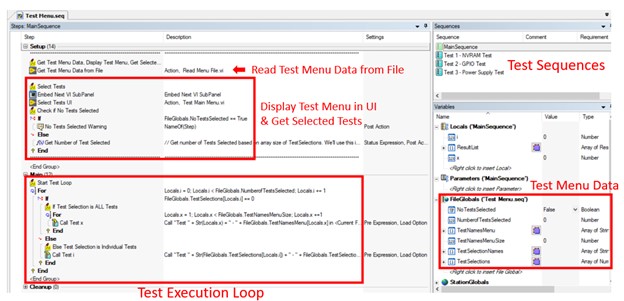
Figure 2 – the Test Menu TestStand Sequence defines the functionality of the Test Menu control.
Functional Test Sequences
The functional test sequences each perform a specific test function on the unit under test (UUT).

Figure 3 – MainSequence is comprised of functional test sequences, each of which appears as an item in the Test Menu control.
There are several best practices that should be followed when developing a test sequence:
- The test sequence should perform ONE, and only one, specific test function on the UUT. As shown in Figure 3, there is a test sequence to perform a test on NVRAM, another test sequence that tests the general purpose IO on the UUT, and another test sequence to check the power supply output on the UUT.
- The test sequence should be modular. That is the test function should fully reside in its own sequence. As shown in Figure 2, all of the steps to perform the Non-volatile RAM test on the UUT resides within the Test 1 – NVRAM Test sequence.
- The test sequence can reside in its own separate TestStand sequence file. While Figure 2 shows all of the test sequences residing within the Test Menu.seq sequence file, these tests can also reside in their own separate TestStand sequence files. In fact, this may be preferable if the test sequence consists of many steps and is very complex. Furthermore, doing so helps achieve the modularity goal of best practice #2.
- There MUST be a test sequence for EACH test listed in the Test Menu control. Referring back to Figure 1, you will notice that each of the 3 tests listed in the Test Sequences executable test sequence in Figure 3 appears in the Test Menu control in Figure 1.
Test Menu Data
There are a number of TestStand data variables that are used by the Test Menu, as shown in Figure 4. You will notice that the Test Menu data variables are defined as TestStand FileGlobal variables. The reason for this is that it will allow easier sharing of the data if the test menu function is called from a Process Model Callback. We’ll get into the details of this in the next section.
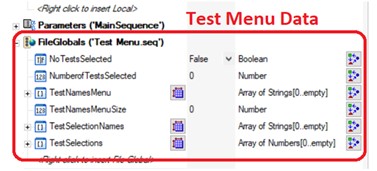
Figure 4 – the Test Menu Data variables are defined as FileGlobal variables.
Figure 5 below provides a table with a description of each Test Menu data variable, along with its variable type and where the data originated. We’ll get more into this as I describe the actual Test Menu function and test sequence steps.
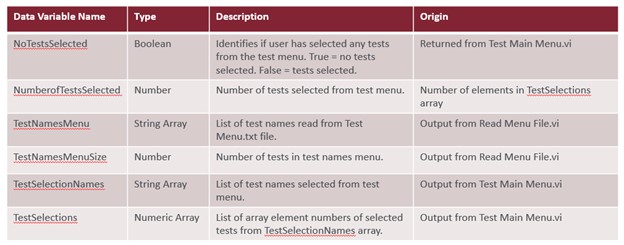
Figure 5 – Names, types, descriptions, and origin of each Test Menu data variable.
Read Test Menu Data File
The first step in the Test Menu sequence is to read the Test Menu Data file. As shown in Figure 6, this step utilizes the TestStand Action step with a LabVIEW adapter to call the Read Menu File.vi.

Figure 6 – Test Menu sequence reads test menu data from file.
A best practice tip is to call this step from the Process Setup Process Model Callback, so that the Read Test Menu function is only executed once at the start of the test session versus calling this step from the Setup section of the Test Menu.seq sequence (as shown in Figure 2) which is called at the start of every UUT test.
Read Menu File.vi
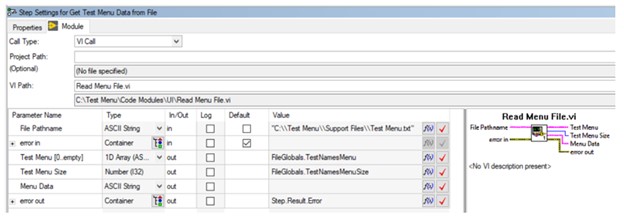
Figure 7 - the module properties for the step.
As can be seen in Figure 7, the input to the Read Menu File.vi consists of the Test Menu Text File pathname. The VI returns an array (list) of test names read from the Test Menu Data File along with the number of tests. This data is stored in the FileGlobals.TestNamesMenu and FileGlobals.TestNamesMenuSize, respectively.
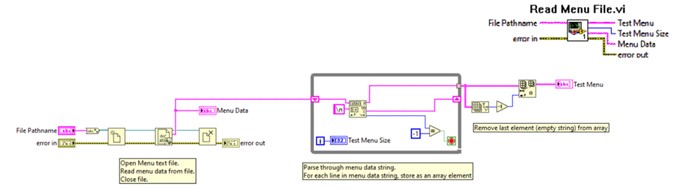
Figure 8 - the block diagram of the Read Menu File.vi.
The Read Menu File.vi performs the following functions:
- Simple text file read: opens file, reads contents of file into a string, and closes file.
- Converts file data string into an array, with each array element representing a specific test name.
- Returns the test name array and the number of tests. Both of these test menu data variables are returned to TestStand FileGlobal variables.
Test Menu Text File
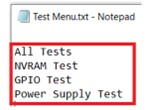
Figure 9 - the Test Menu Text File, labeled as Test Menu.txt, is a simple flat text file that contains the names of all the different tests for a UUT.
The following are some specific details pertaining to the Test Menu Text File:
- This file is created by the test sequence developer using a simple text editor (i.e. Notepad).
- Each line in the file represents a Test Name, aka Test Menu Option.
- The first line in the file must contain “All Tests”. This is the default Test Menu option to run all tests.
- A Test Sequence must exist for each Test Name listed in the file.
- Ideally the Test Sequence Name and the Test Name displayed in the Test Menu should be the same.
If there is one component of this test menu function that requires strict overview and scrutiny, it is the Test Menu Text File and ensuring that the list of names in this file are exactly the same (both in naming convention and quantity) as the test sequences that are developed to test the UUT. Thus, it is very important to ensure that the Test Menu Text File is properly maintained and that when a test sequence is developed, that the test sequence name is added to the Test Menu Text File.
Test Menu Data Sequence – Display Test Menu & Get Selected Tests
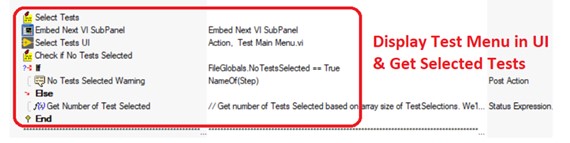
Figure 10 – Steps to display test menu and read selected test.
After reading the Test Menu Data file, the next function of the Test Menu sequence is to display the Test Menu and get the tests selected by the test operator from the Test Menu. Figure 10 above shows the steps in the Test Menu sequence to perform these functions. Following are some details related to the execution of these steps:
- As mentioned in the Introduction, the Test Menu can be used with or without the Bloomy EFT Module for TestStand. In Figure 10, the example sequence shows how the Test Menu is implemented with the Bloomy EFT Module for TestStand. If you are not using this software, then you would simply remove the test step labeled “Embed Next VI SubPanel” from your sequence.
- Utilizing a TestStand Action Step with a LabVIEW adapter, the Test Main Menu.VI is called. This VI displays the Test Menu (list of tests – provided from the output of the Read Menu File.vi) with the default option set to “All Tests” and returns the tests selected by the test operator.
- Validate if tests have been selected and the number of tests selected.
- Best practices tip: These steps could be moved to the PreUUTLoop Process Model Callback. This would clean up the look of the Test Menu sequence.
Test Menu Data Sequence – Test Main Menu.vi
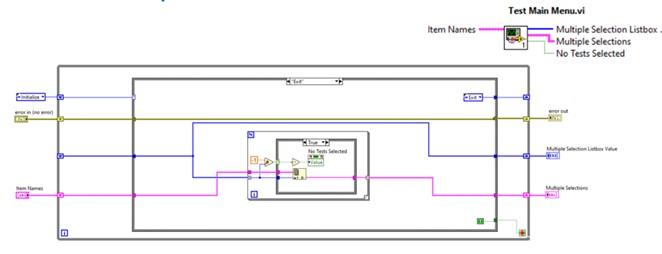
Figure 11 - the block diagram of the Test Main Menu.vi.
As previously mentioned, the Test Main Menu VI displays the Test Menu control and will return a list of the tests selected by the test operator. The VI is a simple state machine utilizing a list box. Here are some further details:
- Initialize list box (test menu) with the test names provided by the Read Menu File.vi and sets the default test selection to “All Tests”.
- Displays the list box (test menu) and waits for the test operator to make the test selections from the menu.
- Once the operator completes the test selections (presses on VI’s Test Selected control button), the VI filters through the list box items and returns the selected test names (string array), the test selection(s) (array element) number (numeric array), and if (no) tests were selected (Boolean). These are returned to the TestStand sequence FileGlobals Test Selection Names, Test Selections, and No Tests Selected, respectively.
Test Menu Data Sequence – Test Execution Loop
The test execution loop is the main function of the Test Menu sequence. This loop executes all of the tests selected from the Test Menu control. The design of this loop is intended to eliminate updates when new tests are added by utilizing the TestStand flow control steps such that execution of the test loop is dynamic and not reliant on the test type or number of tests. In addition, the two “Call Test” step names are dynamically updated with the actual test name during execution and in the test report to clearly indicate the test that is being run.
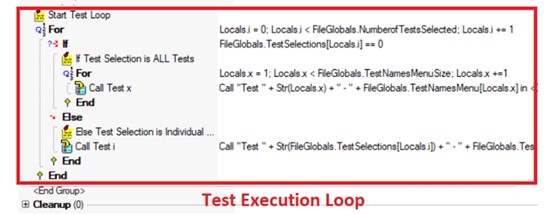
Figure 12 – the test execution loop executes all of the tests selected from the Test Menu Control.
Let’s take a closer look at the architecture of this loop:
- The main FOR loop uses the FileGlobal.NumberofTestSelected as the loop control (limit). This data value was calculated from the Test Selections returned from the Test Main Menu.vi after the test operator selected the tests to run.
- The IF/ELSE statements use the FileGlobals.TestSelections numeric array, which contains the array element number of the test selected. This data was returned from the Test Menu Main.vi after the test operator selected the tests to run.
- The IF statement condition checks to see if the TestSelection element value is 0. 0 would indicate that the “All Tests” option was selected as this is the first option (array element = 0) in the Test Menu.
- The inner FOR loop (following the IF statement) will execute ALL of the tests.
- The ELSE statement will execute the first test selected by the test operator from the test menu, that was not the “All Tests” option.
- The main FOR loop will continue to run until all of the tests selected by the test operator from the test menu are executed.
- Notice, it is possible for the test operator to select “All Tests” AND individual tests from the test menu. The Test Execution Loop will handle this condition by first running all tests and then running any individual tests selected by the test operator.
Summary
Hopefully this Test Menu application demonstrates the power and flexibility for TestStand to not only perform its natural test executive function of automatically executing all tests, but with a few modifications allows the capability to interactively select and automatically run a specific test or group of tests. I believe the architecture of this test menu solution provides a simple, dynamic (i.e., maintenance free) solution to this common requirement.
Related Links